Sync Reo.Dev Segments to HubSpot & Run LinkedIn Ads
Sync Reo.Dev Segments to HubSpot & Run LinkedIn Ads
Use LinkedIn Ads for precise ABM targeting with Reo.Dev Intel, ensuring your ads reach the right accounts.
Reo.Dev Intel Features Used
Key Pages
CRM
Integrations
Reo.Dev Data Sources Used
Key Pages
CRM
Integrations
Account
Centric Playbook
•
1
0
min read
Introduction
In this playbook, you'll learn how to leverage Reo.Dev’s intent signals to build highly targeted audiences based on key high-intent account engagements. These dynamic audiences automatically sync into HubSpot Active Lists, which can then be used as precise audience sources for your LinkedIn ABM campaigns—ensuring your ads reach the right accounts at the right time.
Create Segment
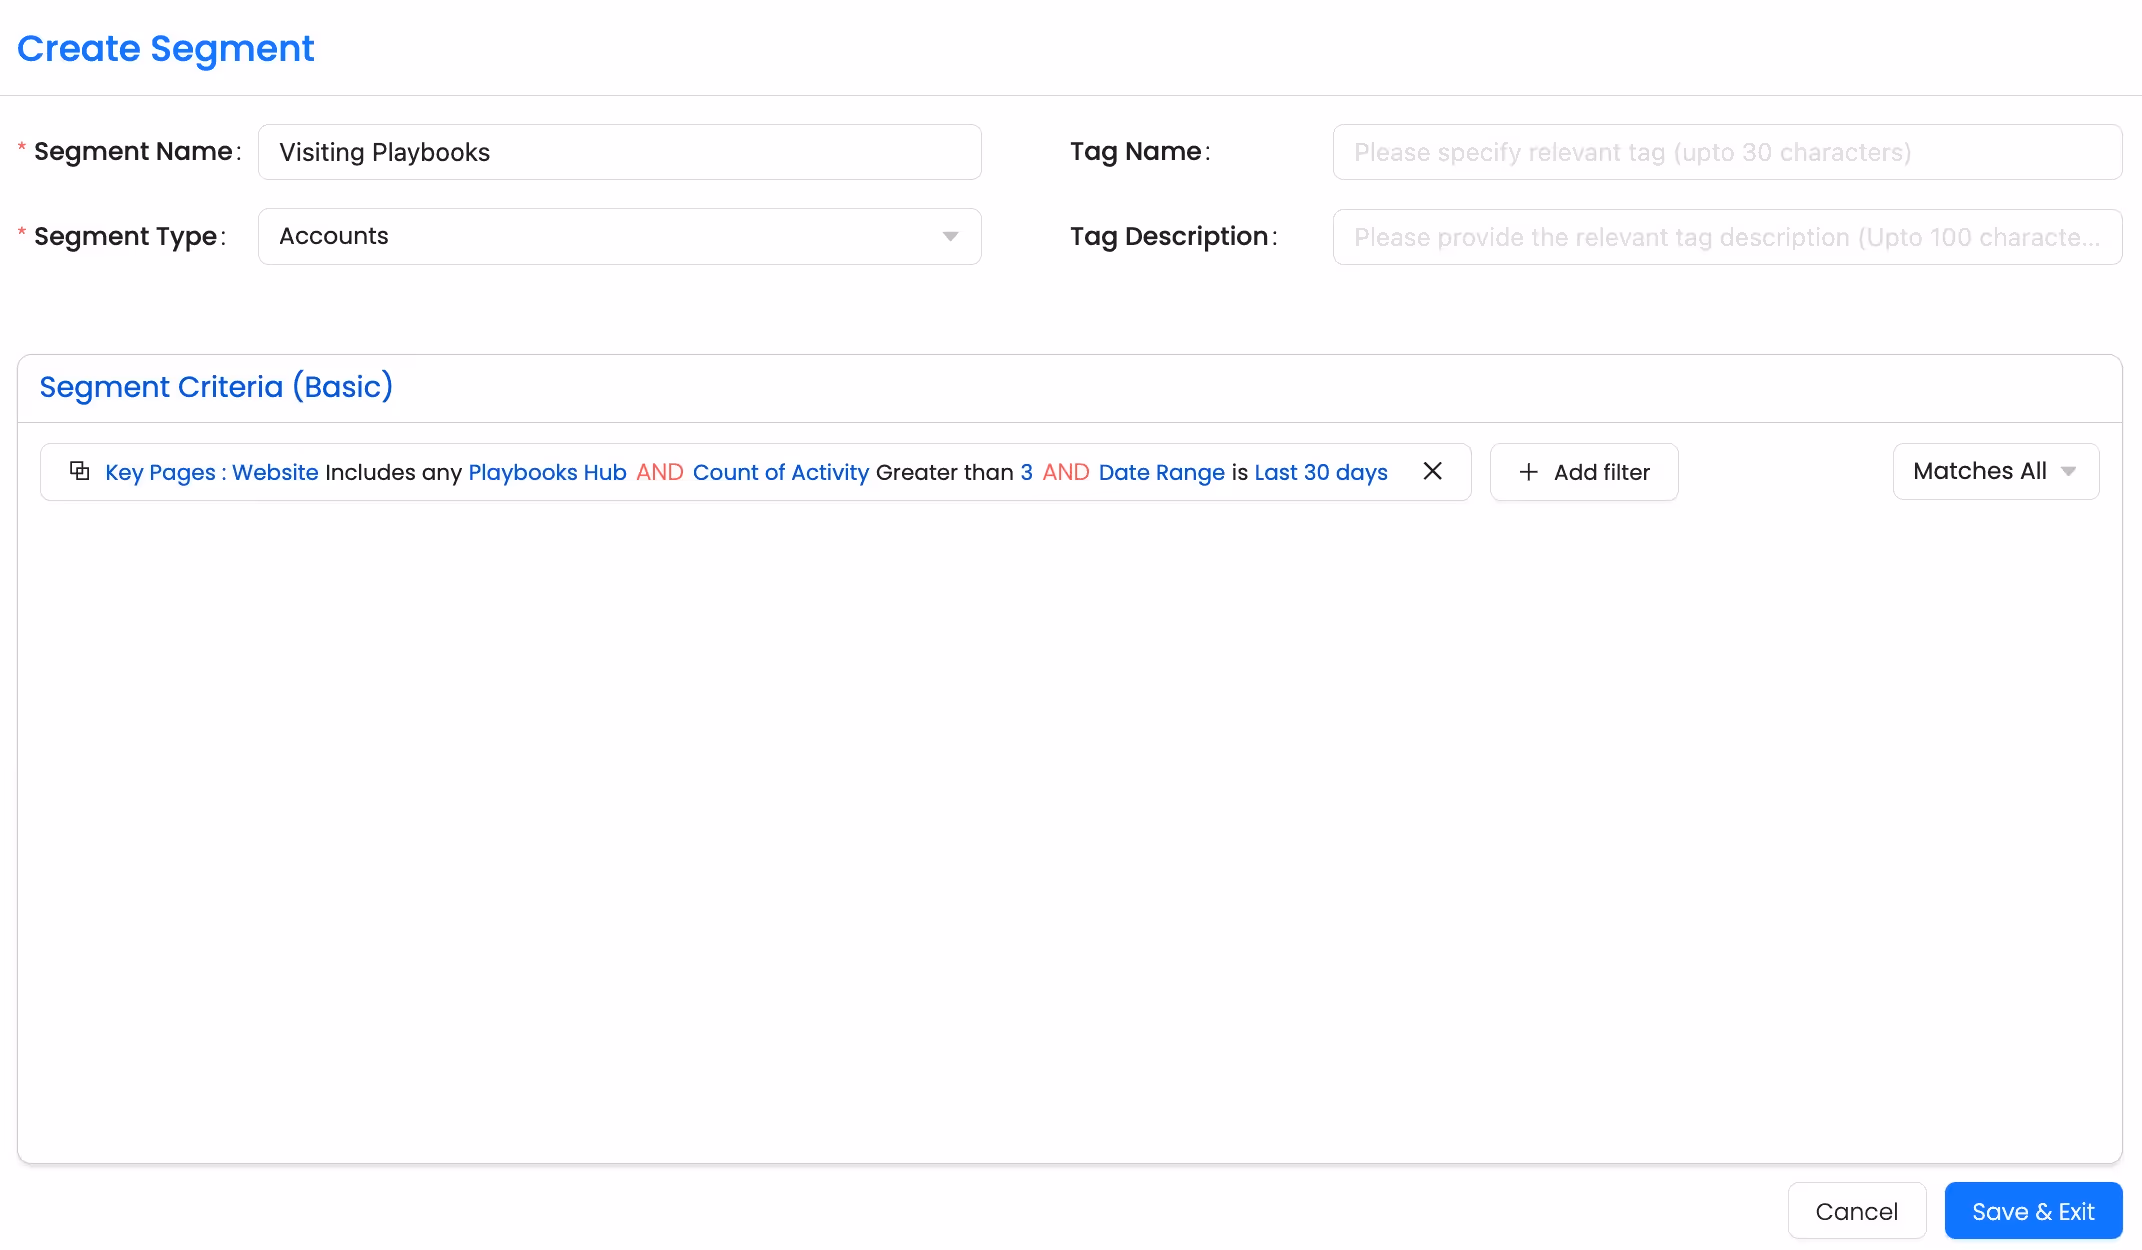
In this segment, we track accounts engaging with a key website page—Playbooks Hub—to identify high-intent visitors.
{{playbook-callout-50}}
Key Considerations for Creating Reo.Dev Segments for LinkedIn Ads
Ensure a large enough account pool – LinkedIn requires a minimum of 300 matched accounts, but we recommend 500+ to compensate for audience filtering and LinkedIn’s match rate.
Adjust based on your GTM motion – If your product has high developer adoption (e.g., open-source tools), apply granular filters like active developers >5, last activity <30 days, or engagement with specific product pages. If you have low inbound volume, expand the criteria to include broader engagement signals.
Align audience intent with ad messaging – Ensure that the accounts in your segment match the intent of your LinkedIn ad creatives. For example, if targeting users who explored pricing, the segment should include accounts that have signed up + visited pricing pages.
Competitor-Based Segments – If targeting competitor users, use Reo.Dev’s GitHub tracking to filter accounts based on deep engagement (e.g., opened an issue, forked a repo) rather than shallow signals like stars or follows.
If your ICP includes large enterprise accounts, the challenge is that big companies have thousands of employees, and a single casual developer exploring your tool could make the entire account appear in your segment—leading to wasted ad spend.
To prevent this, refine your segment criteria by:
Setting Customer Fit Score = High & Medium
Filtering by Number of Developers >6
Increasing Activity Count >10
Using Dev Funnel filter → Set to Build & Deploy (an indicator of advanced evaluation, to learn more: check this blog).
📌 These are suggested filters, but we recommend adjusting them based on your ICP and past trends. For example:
You might find that instead of 6+ developers, accounts with 10+ active developers are more indicative of real evaluation.
Or, in some cases, even 4+ developers may be a meaningful threshold for your ICP.
The key is to analyze past data, spot engagement patterns, and refine segment criteria accordingly.
Always review and refine the segment after creation to fine-tune filters and improve targeting based on the results.
{{playbook-callout-51}}
Segment Criteria
Segment: Basic
Segment Type: Account
Filters:
Under Activity Group → Key Website Pages - Includes any - ‘Select Your Key Page that represents high-intent engagement for your product’
Count of Activity > 3
Date Range: Last 30 days
Tip: Adjust Count of Activity & Date Range based on engagement volume to ensure LinkedIn has enough accounts for audience creation.
Play: Sync High-Intent Reo.Dev Segments to HubSpot & Build LinkedIn Ad Audiences
Leverage Reo.Dev’s engagement signals to create dynamic account segments based on key activities. Sync these segments with HubSpot to build an Active List, which can then be used to create highly targeted LinkedIn ad audiences. This play ensures your LinkedIn campaigns focus on accounts with real buying intent, increasing conversion rates and maximizing ROI.
{{playbook-callout-49}}
Step 1: Sync Segment to HubSpot
In Reo.Dev → Segments, locate the newly created segment.
Click on the HubSpot icon next to the segment name and select 'Send to Hubspot'.
Confirm the sync in the popup window.
Wait 15-30 seconds for confirmation.
The HubSpot icon turns green once synced successfully.
🔹 Note: Large segments may take 15 minutes to 24 hours to sync in HubSpot.
Step 2: Create a HubSpot Active List
Navigate to HubSpot → CRM → Lists.
Click Create List.
Choose Company-based list.
List Name & Type: Give a descriptive list name and select 'Active List' as the type of list you are creating. Then click on Next.
Click Add Filter → and click on 'Company Properties' under Object Information.
Search “REO: Segment Name” and select it.
Search for the Segment Name you synced from Reo.Dev and select it from the dropdown.
Once you've reviewed the list preview filtered by REO: Segment Name and confirmed its accuracy, proceed to save the list.
Tip: Ensure the estimated audience size is large enough for LinkedIn audience matching.
Step 3: Create a LinkedIn Audience in HubSpot using the Active List
Go to HubSpot → Marketing → Ads.
Click on Create → Audience.
Choose Company List as the audience type.
Search and select the HubSpot Active List you just created.
Select the LinkedIn Ad Account from which you wish to run ads.
Assign a Descriptive Audience Name for your reference.
Click Create Audience.
Note: If the audience size is too small, LinkedIn may not allow ads to run. Modify your segment criteria in Reo.Dev accordingly to capture a decent pool of accounts.
Step 4: Use the Audience in LinkedIn Ads
Now that we’ve synced our Reo.Dev segment → HubSpot Active List → LinkedIn Audience, it’s time to put it to work inside LinkedIn Ads Campaign Manager.
4.1: Finding Your Synced Audience in LinkedIn Ads
Log into LinkedIn Ads Campaign Manager.
Navigate to "Plan" → Click on "Audiences".
Here, you’ll see all available audiences inside LinkedIn.
Search for the audience name you created in HubSpot. It should match exactly with what you set up in HubSpot.
Check the Source Column—it should be labeled as Third-party: HubSpot to confirm the sync.
4.2: Audience Processing Status:
If you check immediately after creating it, the status will likely be “Building” as LinkedIn processes the data.
Depending on the audience size, processing can take anywhere from a few minutes to 48 hours.
Once processed, LinkedIn will display the match rate (%)—a higher match rate ensures better ad performance.
4.3: What If the Audience Size Is Too Small?
If your audience status is marked as “Too Small”, LinkedIn won’t allow you to run ads with it. Here’s what you can do:
Expand your segment criteria in Reo.Dev—capture a broader set of accounts by increasing activity thresholds or date ranges.
Wait for the next sync cycle—Reo.Dev syncs segments to HubSpot daily, and HubSpot updates LinkedIn audiences automatically.
Manually create a new, broader segment—if waiting isn’t an option, create a new segment in Reo.Dev with refined filters and sync it to HubSpot to start fresh.
Important: To run LinkedIn ads, your custom audience must contain at least 300 matched accounts—this is the minimum threshold. However, for optimal performance, LinkedIn recommends larger audiences.
4.4: Best Practices to Refine Your Custom Audience Further in LinkedIn Ads Manager
Once your custom audience is ready, apply these best practices to reduce wasteful ad spend and maximize conversions:
1️⃣ Refine by Location
Inside LinkedIn Campaign Manager, specify the countries, states, or regions where your target audience is based.
This prevents ads from being shown in irrelevant geographies, keeping the focus on high-value markets.
2️⃣ Narrow by Job Titles & Seniorities
Under “Who is your target audience?”, define the exact job titles, seniorities, or functions relevant to your ICP.
Example: If targeting engineering leaders, include CTOs, VP Engineering, Head of AI, etc.
This prevents ads from showing to unrelated roles.
3️⃣ Disable "Audience Expansion"
Uncheck the Audience Expansion box in LinkedIn Ads Manager.
Why? This prevents LinkedIn from overspending on irrelevant leads or showing ads to accounts outside of your target list.
4️⃣ Use the Exclusion Feature for Precision
Under Audience → Exclude by Attributes, refine targeting by removing:
Irrelevant job functions (e.g., HR, Admin, Finance if they aren’t your buyers).
Competitors or non-target companies (Upload an exclusion list CSV or use a HubSpot Active List for exclusion).
This helps reduce ad waste and ensures only the most relevant accounts see your ads.
5️⃣ Check LinkedIn's Forecasted Audience Insights
Once your targeting is set, check the right-hand panel in LinkedIn Ads Manager.
This shows:
Estimated audience size
Breakdowns by industry, company size, job function, years of experience
Use this as a final check to confirm your audience matches your ICP.
4.5: LinkedIn Audience Statuses & What They Mean
When working with LinkedIn Audiences, you’ll see different status labels. Here’s what each means:
Pro Tip: If your audience is too small, follow the steps mentioned above to increase its size in Reo.Dev and let it sync automatically.
4.6: Final Step: Launching LinkedIn Ads with Your Custom Audience
Now that your custom audience is ready, it’s time to set up your LinkedIn Ads campaign. Choose a campaign objective (Website Visits, Lead Generation, or Engagement), select your custom audience from HubSpot, and refine targeting with job titles, seniority, and location filters to ensure precision. Set your budget, bidding strategy, and ad placements, then design compelling creatives—Carousel Ads, Single Image Ads, or Video Ads—that align with your campaign goals.
Before launching, enable conversion tracking with LinkedIn’s Insight Tag to measure performance and optimize for engagement. Finally, review LinkedIn’s forecasted audience insights, verify your targeting aligns with your ICP, and hit Launch Campaign to go live.
With this, your LinkedIn ABM strategy is fully set up, ensuring your ads are reaching the right accounts at the right time.
Summary
This playbook covered the step-by-step process of syncing high-intent Reo.Dev segments to HubSpot and using them as audience sources for LinkedIn Ads. It begins with creating a segment in Reo.Dev based on key page engagement, such as visits to Playbooks, and applying filters like activity count and recency to refine the audience. Next, it walks through syncing this segment to HubSpot, setting up a dynamic Active List, and ensuring it remains updated with new accounts that meet the criteria. Finally, it covers how to use this Active List to create a LinkedIn Ads audience, ensuring targeted ABM campaigns reach engaged accounts with relevant messaging.
Talk to Our Team
Need help to understand this playbook or implementing it? Book a call with our team for guidance. Have a custom playbook requirement or feedback to share? We’d love to hear from you! Simply schedule a meeting, and we’ll help you maximize your results with Reo.Dev
If you have any questions or need help, you can reach out to us in our Slack customer channel, schedule a meeting with our team, or email us at support@reo.dev. We’re here to support you every step of the way and ensure you get the most out of Reo.Dev!
The user logged into Reo.Dev after connecting the CRM must have CRM permissions enabled to sync segments. For detailed steps, refer to the How to Sync a Segment in Reo.Dev guide.
LinkedIn Ads Integration in HubSpot
The HubSpot user syncing the LinkedIn Ads account must have "Publish" access to the Ads tool.
The same user must be an Account Manager in the LinkedIn Ads account.
If LinkedIn Ads is not yet connected to HubSpot, follow this guide to complete the setup.
Once these prerequisites are met, you can proceed with syncing Reo.Dev segments and creating LinkedIn Ads audiences in HubSpot.
Prerequisite: Ensure Your Activity Filters are Integrated in Reo.Dev
Before finalizing your segment criteria, ensure that the filters you use—such as website visits, product documentation views, code interactions, product logins, GitHub repositories, etc —are properly integrated and tracked within Reo.Dev. If the data is not being captured, your segment may not populate correctly.