Sync Reo.Dev Tags Intel to HubSpot & Automate Contextual Emails
Sync Reo.Dev Tags Intel to HubSpot & Automate Contextual Emails
Automate personalized email outreach based on real-time developer activity.
Reo.Dev Intel Features Used
Key Pages
Product Docs
Website Pages
Integrations
Tags
Reo.Dev Data Sources Used
Key Pages
Product Docs
Website Pages
Integrations
Tags
Account
Centric Playbook
•
1
0
min read
Introduction
In this playbook, we will walk through the process of syncing Reo.Dev Tags to HubSpot and automating contextual email outreach using the tag data. This will enable users to automate highly contextual email campaigns based on developer interest signals captured within Reo.Dev.
Use Case: DevTool Startup in AI/ML Space
To make this playbook practical, we will take the example of a DevTool startup working in the AI/ML space. The company is targeting developers and engineering teams working on AI/ML projects, particularly those exploring LangChain Integration and NLP Models.
Types of Tags
Reo.Dev allows users to create two types of tags:
Account Tags – Associated with company-level segments.
Developer Tags – Assigned based on individual developer activity.
In this playbook, we focus on Account Tags as we will sync them with HubSpot for automated outreach.
Tags Column Preview in Reo.Dev Accounts Panel
How Tags Work in Reo.Dev
Tags are created when you define segment criteria.
If an account meets the defined criteria, the tag is automatically applied.
Tags show up in Reo.Dev UI and can be used to filter accounts.
Filter Segments by Tags in Reo.Dev
If HubSpot is connected, these tags sync to HubSpot CRM.
Tags update in real-time as account activity changes.
To learn more on how you can leverage Tags in Reo.Dev, check the Tags Handbook:
To ensure seamless syncing between Reo.Dev and HubSpot, follow these steps:
If the HubSpot icon appears next to an account, it means the account is already synced.
If an account is not synced, users can:
Manually sync accounts from the Reo.Dev UI.
Sync entire segments where tagged accounts exist.
Recommended Sync Settings in Reo.Dev
Before creating a Workflow in HubSpot, ensure that HubSpot CRM sync settings are optimized in Reo.Dev:
Navigate to Reo.Dev Settings → Integrations → HubSpot CRM Settings.
Under Export & Sync Settings, enable:
✅ Export both Accounts and Contacts to HubSpot.
✅ Automatically sync contacts associated with an account.
Why Enable These Sync Settings?
Ensures that when new accounts are discovered in Reo.Dev, they sync automatically to HubSpot—even if they weren’t previously in your CRM.
If Automatically Sync Contacts is turned off, only the company-level account is pushed, leaving out valuable contact-level data.
Without contacts synced, the workflow email will have fewer recipients, reducing overall outreach impact.
Create Segment
For this playbook, we create two account segments as we need to create two different tags:
LangChain Integration
NLP Models
Defining Segment Criteria
Segment criteria for tags depend on what kind of activity you want to track. For this Playbook, we will track key page visits on our first-party assets like website and product documentation.
Play: Engage Developers with Automated Contextual Outreach in HubSpot
Use the created Reo.Dev Tags synced with HubSpot to automate highly relevant email outreach based on developer activity.
Step 1: Creating an Automated Email in HubSpot
Navigate to Marketing → Email
Click Create Email.
Select Automated as the email type.
Create an email template with contextual messaging.
Use tags intel to personalize the email copy.
Subscription Type: Ensure it is set to Marketing Information in HubSpot to be able to send emails.
Enable this setting to exclude low-engagement contacts, improving email deliverability and focusing outreach on high-intent prospects who have shown interest based on Reo.Dev tags.
{{playbook-callout-54}}
Breaking Down the Email Strategy
A well-crafted email strategy ensures relevance and engagement. Here’s how we optimize email outreach using Reo.Dev Tags synced to HubSpot:
Personalization: Uses first name and developer activity signals from Reo.Dev to tailor the messaging.
Question-Oriented Approach: Starts with a problem-based question to spark engagement rather than a generic statement.
Value-Driven Content: Provides useful resources, addressing common challenges rather than pushing a sales pitch.
Engineer-First Outreach: Frames the conversation from a technical problem-solving perspective instead of leading with sales.
Soft Social Proof: Subtly integrates industry credibility, such as mentioning the number of AI-first companies using similar solutions.
Disclaimer: This is a sample template and should be customized based on your product, messaging, and engagement strategy. Marketing messaging evolves through experimentation.
Step 2: Create the HubSpot Workflow
Navigate to Automations → Workflows
Click Create Workflow → From Scratch.
Select Company-Based Workflow.
Name the workflow.
Defining Enrollment Criteria
Select Company Properties.
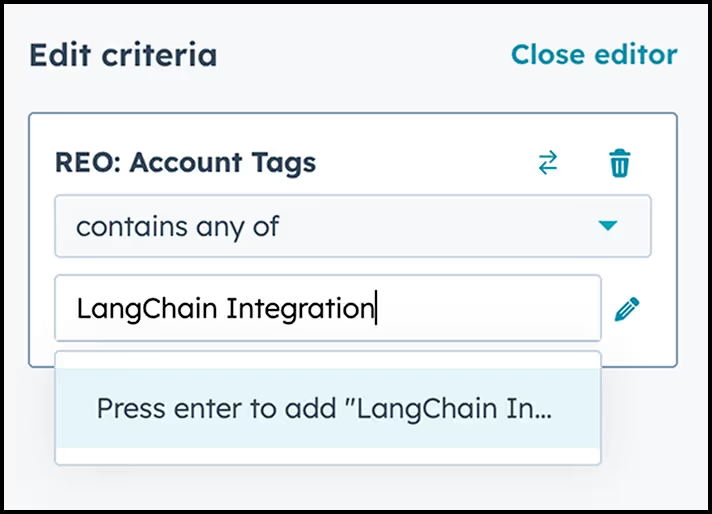
Search & Select REO: Account Tags.
Choose "contains any of" option from the select dropdown → Type your tag name and press enter to save it.
Add another filter if you are filtering for more than 1 tag. In our case it would be REO: Account Tags → "contains any of" → NLP Models.
Ensure each tag is added as a separate filter for accurate filtering.
Setting Up the Action Step
Click “+” → Select Communications → Send Email.
Choose the automated email template created earlier.
Set association label to All Contacts.
Clive Save.
Why Set Association Label to All Contacts?
The association label determines which contacts within a company will receive the email. HubSpot allows different labels, including All Contacts, Decision-Maker, Buyer, or any custom labels your team has created.
Recommended Approach (All Contacts): If most accounts filtered by these tags are new or cold, setting the association label to All Contacts ensures broader reach and maximizes engagement.
Alternative Approach (Custom Labels): If your team wants more granular targeting, you can manually review and segment contacts using advanced filters in HubSpot. You can then assign specific labels like Decision-Maker or Developer to tailor email messaging for different personas.
For this workflow, we recommend using All Contacts, as our goal is to capture as many relevant touchpoints as possible.
Step 3: Configure Workflow Settings & Go Live!
Enrollment Settings
Decide whether to enroll existing companies immediately or only new ones.
Recommendation: If fewer existing companies match criteria, enroll immediately.
Timing & Performance Settings
Configure workflow run times (e.g., within working hours).
🔹 Best Practice: Keep default settings unless your team requires specific modifications.
Explore Our Tags Handbook for Broader Use Cases
This use case illustrates how tags can be used. To discover more tag-based strategies and additional examples, refer to the complete Tags Handbook. It includes several other versatile use cases, allowing you to create customized outreach strategies by leveraging pre-built and custom tags in Reo.Dev.
{{playbook-callout-6}}
Summary
By implementing this workflow, you can:
Leverage Reo.Dev Tags to enrich account intelligence in HubSpot.
Automate personalized outreach based on developer activity.
Drive contextual engagement with high-intent prospects.
Talk to Our Team
Need help to understand this playbook or implementing it? Book a call with our team for guidance. Have a custom playbook requirement or feedback to share? We’d love to hear from you! Simply schedule a meeting, and we’ll help you maximize your results with Reo.Dev
If you have any questions or need help, you can reach out to us in our Slack customer channel, schedule a meeting with our team, or email us at support@reo.dev. We’re here to support you every step of the way and ensure you get the most out of Reo.Dev!
The prerequisite for segmenting accounts based on their interaction with key web pages is to have the Reo.Dev Tracking Beacon installed on your website and documentation.
📌 Tracking Beacon Setup: Before setting up segments, ensure your website and documentation pages are properly tracked.
Navigate to Settings → Integrations → Tracking Beacon in Reo.Dev.
Configure key pages/code interactions for website, documentation, product, and code interactions.
Once key pages are configured, Reo.Dev can track activity and segment accounts accordingly.
Key Pages Configurations Preview in Reo.Dev Tracking Beacon Settings
Example Email Template
Subject: Struggling with LangChain Integration or NLP Model Training?
Hey {First Name},
Are you facing challenges with LangChain integration or NLP model training workflows?
We’ve seen engineers hit roadblocks with prompt chaining, fine-tuning inefficiencies, and scaling issues—so I wanted to share some resources that might help:
LangChain best practices → {Guide Link}
Optimized NLP model training workflows → {Resource Link}
Let me know if you need any insights—happy to connect you with an engineer.
PS: {X number} of AI-first companies have already solved these challenges with us. Here’s how: {Case Study Link}.